PRI

'Moving' Through COVID-19

IMG_2510.jpeg

During the COVID-19 pandemic, with the stay at home orders in place and gyms closed, I have seen many more people walking and running when I’ve been out running or on our family walks. It’s great to see people out doing the same thing and spending time together. Here are some tips that may be helpful.

  1. Choose an appropriate shoe. Thanks to Lori Thomsen, MPT, PRC at The Hruska Clinic (the PT clinic started by Ron Hruska, founder of The Postural Restoration Institute), we have a list of shoes that meet specific criteria. We recommend shoes that have a solid heel counter (to allow for heel stability and the foot to supinate and pronate as it should during the gait cycle) and bend at the toe box and not in the middle of the shoe (to support your arch and allow proper push off). Here’s the Recommended Shoe List link.

    As you will see the list is organized by what type of arch you have (low, average or high). When you try on a shoe, it should feel comfortable right away. If you feel like you have to “break it in” it’s not your shoe. When walking in the shoe, you should be able to “sense” your heel, arch and big toe. In the ideal scenario, I (or your PT) would perform objective tests on your neck, shoulders/ribcage and hips/pelvis to determine the best shoe for your body. However, currently we are limited with social distancing. The best way for you to pick a shoe right now is by feel and comfort. We are fortunate to have Big River Running in St Louis making home deliveries. My current clients are ordering 2-3 pairs from the appropriate column and determining the best shoe by comfort when walking in them and then returning the ones that don’t work. Perhaps you have a local running store in your area that would be happy to have your business. If you need assistance to determine your arch type, I can do this remotely; please contact me: nancy@integrate360pt.com.

  2. Swing your arms. When you are walking or running, it is very important that you swing your arms. Forward motion of your arms allows your trunk (ribcage and thorax) and therefore your pelvis to rotate and move as it should. I encourage my clients to see their fingers in their peripheral vision as they are walking. This will help ensure that your arms are moving forward. This will necessitate that you take your hands out of your pockets when you are walking. In addition, if you are walking your dog, consider a waist leash to free your hands allowing for arm swing.

  3. Increase your distance gradually. There’s a tried and true 10% rule in running. It states that you should increase your distance by 10% each week. For example, if you are running 10 miles/week, you should increase to 11 miles the following week. This is to avoid overuse injuries. It’s tempting with being cooped up in the house and then going for a walk or run in the nice spring weather to not push yourself to go further when you are feeling good and strong. But don’t give in. Be smart and remember slow and steady wins the race!

  4. Stay nourished, rested and hydrated. Eating healthy, consistent meals, being well rested, and staying hydrated are all essential to keeping your immune system strong! These three may be common knowledge, but during this pandemic, it’s especially important to eat nutritious meals throughout the day and also get 7-8 hours of sleep at night. Maybe not as known is maintaining adequate hydration. You should drink 1/2 to one ounce of water for every pound you weigh. So, if you weigh 150 lbs, you should drink 75-150 ounces of water per day. Of course, you will need more water if you are exercising and sweating more.

    Please keep moving! If you are working from home or staying home more, it’s difficult to get in as many steps during the day when you are not walking around the office, walking to and from public transit or running errands. You will have to make a conscious effort to get up from your desk and go out for a walk or run. But once you keep moving, you will feel better!

Sandals - What You Need To Know

Anyone that has been through a PRI program knows that shoes are extremely important to the success of said program. The Hruska Clinic (the clinic that the creator of the Postural Restoration Institute, Ron Hruska, owns and works out of) puts out a biannual shoe list where they look at hundreds of different tennis shoes, breaks them into categories to help clinicians narrow down the options for our patients, then lists a few shoes in each category (see current shoe list HERE). Having proper footwear can make or break a program. For our patients who present in a pattern (or are not in neutral in one or multiple areas of their body), these shoes can kick start their program instantly getting them in to neutral and saving weeks of work! However, once our patients lift scores get to a 3 out of five or higher, they have some options in terms of footwear. Since spring has sprung and we know that our patients will be wearing sandals at some point regardless of lift score, we wanted to you know what to look for in a good sandal.

1) Avoid a heel. Having any height in your heel will push the weight of your body onto the ball of your foot. We are designed to bear our weight through our heels. When we are forced into an unnatural ankle and foot position, we must counterbalance our weight up the chain so that we do not fall forward. The most typical compensation for this is to lean back in the shoulders accentuating the curve in the lower back and possibly pushing the head forward. This can quickly cause lower back, shoulder, and neck pain. 

2) Choose a shoe that is attached to your foot. When we wear a shoe that hangs on our foot like a flip flip or a mule, we have to work harder to keep that shoe on our foot while we walk. This may include gripping the shoe with our toes, lifting our toes up excessively, or even rotating our hips so that our toes point slightly outward. All of these compensation patterns cause excessive and abnormal muscle use which can irritate many areas including our foot, ankle, knees, hips, and lower backs. Choosing a shoe that straps at or around the ankle will ensure that the shoe stays on your foot while walking and you don’t have to work as hard!

3) Try to find a shoe with heel support. Although this is quite a challenge, it can be done. Many people realize the importance of having good arch support in a shoe for good foot and ankle alignment. However, many do not realize that what really determines the arch’s position is the heel bone or calcaneus. If you are able to find a sandal that encompasses the heel and gives it some support via a more rigid material, your arch will be much more stable. 

4) Feel your arches. As mentioned above, managing your heel position is very important, but it’s still essential to have support under your arches. Try to find a pair of sandals that has enough arch support built into it that when you stand and walk you can feel the material of the shoe supporting your arch. There should not be a gap between your arch and the shoe. Additionally, there should there never be so much build up that it’s painful or you feel as though it’s pushing your weight to the outside of your foot. The ability to sense and feel your arches helps your body to utilize your glut max muscle. This helps to keep your lower back from overworking and can help to strengthen those very important gluts!

5) Go for comfort. Whatever sandal you chose needs to be comfortable. Think about the last time you wore a pair of shoes that gave you a blister. First of all, remember how much that hurt. Second, remember how strangely you walked to avoid rubbing the blister even more? It’s obvious that when you walk oddly to avoid pain, you’re not walking in a biomechanically correct way which can lead to form breakdown and pain.

6) Limit your use. No matter how many of the above boxes your selected sandals check, we all have a limit to what our bodies can handle with less than desirable shoes (aka not tennis shoes). Listen to your body when you wear your sandals. You’ll soon begin to notice how much time or activity you can tolerate in those shoes before your body starts to break down. Have a your tennis shoes at the ready for when you drive home after that wedding or only wear them when you’re going to a nice dinner and won’t be on your feet much. 

Written by Lesley Callaham, MPT, PRC      April 2, 2019

Why Do Stairs and Squats Hurt My Knees?

Squatting and going up and down stairs are some of the most common irritants of knee pain. Have you ever wondered why? Is there anything you can do to ease the pain? To really understand this, we must first understand some anatomy and biomechanics. 

First, the anatomy: The knee cap is a bone called the patella. It is embedded within the quadriceps tendon. The quadriceps attach to the front of your pelvis and upper femur (thigh bone). It then runs down the femur, over the front of the knee joint (where the patella is located), and finally attaches to the front part of the upper tibia (shin bone). The patella is located where it is in order to protect the quad tendon from damage or tearing as it is compressed into the knee joint when the quad is stretched and knee is flexed/bent. The patella sits in a groove between the medial and lateral condyles of the lower femur to help stabilize it. 

Next, the biomechanics: Muscles connect two bones and move them. During a concentric contraction, the muscle shortens and the two bone move closer together. An eccentric contraction allows the muscle to lengthen slowly and allow the bones to move father apart with control. An example of these two contractions is a basic bicep curl. During the concentric contraction, your bicep pulls your lower arm and hand closer to your shoulder. The eccentric contraction is essential to slowly lower your hand back toward the floor. If we weren’t able to eccentrically contract our muscle, our hand would simply fall to the floor and we would develop an injury as a result. 

Squatting requires the quadriceps muscle to eccentrically contract as we lower ourselves to the floor (knees are bending) and concentrically contract to lift ourselves back up (knees are straightening). As we climb stairs, we use our quads concentrically to push ourselves up the stairs. Descending the stairs requires eccentric quad control to slowly allow our knees to bend with control and bring us down to the stair below us. Both of these activities are particularly challenging due to the amount of weight we are moving with each motion. 


In order for these motions to happen correctly, it is essential to have our weight in the correct place on our feet with these activities. 

When it comes to stairs, we typically have the weight mostly on the balls of our feet. This can be due to wearing heels, short stairs versus a long foot, needing to hurry up/down the stairs, etc. In order to go up the steps correctly and avoid knee pain, we need to place as much of our foot on the step as possible to allow our heels to get on the step or as close to it as possible. Then we need to push up the stair by pressing through the middle and back of our foot. If we push up through the ball of our foot, the quad has more load on it during the activity and presses the knee cap into our knee joint very hard. Going up the steps pushing through our heels also helps us use our gluts to push us up the step and not our lower backs!


To go down the stairs, we need to keep our weight on our heels as long as possible. For instance, if you are using your right leg to support you while your left leg is lowered down to the step below, you need to keep your weight on your right heel as long as possible. The second our weight transitions forward onto the ball of our foot, our quad turns on. If our quad is on, it cannot eccentrically lengthen and allow us to descend in a biomechanically correct way. If this is the case, you will simply press your kneecap into your knee joint as you essentially fall to the stair below you. If you start with irritated knees, it won’t take many steps for this to become really painful. 


We encounter essentially the same problem with squats, but luckily it is much easier to correct! Typically people will transition onto the balls of their feet when beginning to stand up straight. Keep your weight through your heels for the duration of the exercise and you should notice a dramatic improvement in your tolerance!


Written by Lesley Callaham, MPT, PRC on February 20, 2019

How To Breathe When Working Out And Running! Via Bodybuilding.com

Image from bodybuilding.com

Image from bodybuilding.com

There’s a great article on Bodybuilding.com entitled How To Breathe When Working Out And Running! I wanted to share it with you all it gives some great, concise information. I love how to emphasize the importance of breathing during every type of exercise. However, I wanted to give a little more information or my thoughts on some of the topics in the article.


First, most of our patients are not performing dead lifts, therefore, I DO NOT RECOMMEND using the valsalva maneuver at all. This is a tool that can be helpful as they described, but only during certain activities and only with proper training. I want to be sure that anyone who reads the article does not think it’s appropriate to performing the maneuver when lifting lighter loads like an overhead press, leg press, or something similar. As the author writes in the article, it is appropriate to exhale slowly through pursed lips during the lifting portion of those activities. 


Breathing out through pursed lips is a great technique as it creates more resistance to an exhale and effectively makes you work harder to breathe out. This sets you up to more effectively use your abs (specifically your internal obliques and transverse abdominis) when exhaling. When we exhale with these muscles, our diaphragm is in prime position to be utilized during the next inhalation. This leads to more effective inhalation, better oxygenation, and less overflow into our lower back and/or neck muscles to help us get air in quickly. 


Second, the author describes that as we exhale our ribcages shrink. This should be, but isn’t always, the case. Depending on what exercise we are doing and what position we are in, we may not allow our lower ribs in the front to fully collapse or drop down during an inhalation. When this is the case, our diaphragm is not in a good position for our next inhale and we will compensate to get air in. This can lead to shortness of breath, poor endurance, fatigue/pain at the neck or lower back, and other problems. 


When you position yourself in a supine position (lying on your back), try to keep your lower back as close to the floor as you can get it. Use your abs to pull your lower ribs toward the floor and flatten your back. Try to keep your lower back as close to the floor as possible during your activities WHILE BREATHING. If you are on a bench doing chest work, you may need to keep your feet up on the bench with you. If you need or choose to put them on the floor, be aware that it will be much more challenging to keep your abs engaged and your lower back in a safe position during your activity. Be sure to exhale through pursed lips and drop those ribs toward the floor/bench as you lift. 


Lastly, I love the idea of paced breathing with cardiovascular work. I simply want to mention that just because the author suggested breathing in for 3-4 stairs as well as out for 3-4 stairs does not mean that it is a good pace for your individual body. Because you are doing cardiovascular work, expect to be slightly short of breath during that activity, but please alter your pace if it feels like you are starved for air or that you’re panting. Also, recognize that your pace will change from day to day. If you go into your work out feeling well energized and motivated, you may notice that you are able to ascend/descend 4-5 stairs during a breath without much effort. However, you may feel sluggish at your next work out and notice that you are starving for air at 5 stairs. No problem! Slightly increase your pace of breathing so that you are comfortable again. Listen to your body and react accordingly. 


Just be sure that, no matter what you’re doing with only a few exceptions, never stop breathing and breathe at a rate that feels comfortable to you!


Written by Lesley Callaham, MPT, PRC on January 22, 2019

How to Shovel (Through a PRI Lens)

Image from www.thegentleplace.com

Image from www.thegentleplace.com

The snow is here! And there may be more snow on the way so it’s important to know how to shovel your drive and walkways without causing excessive pain or injure yourself. 

1) Wear good shoes - You’re about to lift a lot of weight so having appropriate footwear is important. A good foundation for your foot allows for proper weight bearing through your legs and overall alignment of your body. If you feel comfortable and the snow is not too thick, just wear your tennis shoes.  If the snow is deeper, wear snow boots with good, supportive or any custom orthotics you may wear. 

2) Choose a good shovel - We all know that tools can make or break a job so choose a shovel that won’t break your back! We like ergonomic designs where the handle is slightly bent so that the shovel blade is lower to the ground. This is useful so you don’t have to bend over so far to get your blade to the ground. It also makes scooping the blade under the snow easier.

3) Squat - Once your blade is under that snow, you’re going to have to lift it. Be sure to squat down BEFORE lifting the snow. Place one foot slightly ahead of the other and press through your heels, as if you’re pushing the ground away from you, while you straighten your knees and stand up. It’s similar to pushing the footboard away from you on a leg press machine. You may be able to rest your forearms on your thighs to help lift the heavy snow off the ground. 

4) Use your abs - Now that you have all that weight lifted you’re going to have to move it off to the side. Do this by using your abs! Their job is to tuck your ribs, round your back, and twist your body. As this post is through a PRI lens, we want you to use your left abs a lot more than your right. In order to do this, you’ll need to have your left foot ahead of your right with your left hand farther down the shaft of the shovel (closer to the blade). As you get ready to through your snow to the side, be sure that your left shoulder stays lower than your right (trunk slightly bent to the left) and sense and feel your left abs rotate your trunk to the left so that your breast bone ends up facing toward the left. Your abs should be the primary force rotating your trunk, not your arms! It’s important to switch your lead arm/leg while shoveling to avoid fatigue and overuse injury, but as mentioned before, shovel with your left arm and left foot forward most often. 

5) Pace yourself - shoveling is much more taxing to our musculoskeletal and cardiovascular systems than we like to admit. Realize it’s ok to take period breaks to avoid fatigue and give your system a rest!

6) Have realistic expectations - Lifting large amounts of weights for a long time is not something most people do on a regular basis. Be aware that you will feel muscular soreness after doing this. This is normal. Even soreness in muscles that PRI likes to inhibit (lower back muscles, pecs, biceps, etc.) will be sore and that is ok. Shoveling is not a specific, rehabilitative activity; It’s an activity that uses many, many muscles in the body in order to complete a difficult physical task. It’s even acceptable if the pain for which you are receiving treatment gets aggravated. We would like to keep that as minimal as possible using the above tips, but if your body cannot tolerating driving a car, making it through a work day, folding laundry, etc. without feeling pain, it is to be expected that shoveling will exacerbate it to some extent. 

7) DO YOUR EXERCISES! - Be sure to do at least one of your exercises immediately before and immediately after shoveling. The idea is that we want to begin this physically demanding activity with our bodies in the best possible position. It’s likely that we will lose our good position or begin using compensatory muscle groups as we fatigue with shoveling so ending with an exercise (or more) will help put our body back in the correct position and quiet down our overused muscles so avoid excessive pain. 


Written by Lesley Callaham, MPT, PRC January 15, 2019

PRI Sleeping Tips

Image from Huffingtonpost.com

Image from Huffingtonpost.com

We all know sleeping is essential to overall health, but did you know that poor sleep can rob you of producing certain hormones that are necessary for tissue healing? Whether you’ve never been a “good sleeper” or pain is waking you at night, your sleep quality is important to improving your pain and needs to be addressed. Our upcoming blog post will be about improving your sleep hygiene and the quality of your sleep, but this week we will be highlighting the environment and positioning involved with sleeping to minimize pain at night. 

1) The right mattress is important! The Postural Restoration Institute (PRI) recommends a regular, coiled spring mattress. As the mattress is made up of many springs that individually adjust to different areas of the body, it is a great tool for our patients to sense and feel how their body is lying on the mattress and make appropriate adjustments. Conversely, a foam or sleep number mattress is either made of one large piece of material or much larger sections of air/foam. These designs cannot give our patient’s brains/bodies very specific information as to how they are lying, where most of their weight is, etc. Just as important as the type of mattress, be sure you have a quality mattress or make sure it is relatively new. All mattresses pad down overtime which will limit the mattress’ effectiveness in supporting our bodies, helping us realize where we are in space, or cause us to “fall into the ditch” of where the mattress is the lowest. All of these will increase pain and can cause night-time waking.

-If getting a new mattress is cost-prohibitive for you, you can usually find a donated mattress that’s under 90 days old. Most mattress companies offer free 90 day trial mattresses that are rejected are donated to off-set the company’s loss of income. Call around to your local donation centers and you’ll be able to find where the mattress companies donate their almost-new products. 


2) How you support your body differs depending on the position in which you sleep.

- Back sleeping- This is a great position to sleep in, but definitely is the least popular. Be sure to keep a pillow under your knees. This slackens the muscles on the front of our hip and thigh which can pull our pelvis forward and arch our back when we sleep with our knees straight. Use a pillow that is relatively flat, but has enough structure that the arch in your neck is maintained. 

- Stomach sleeping- Unfortunately, this is a pretty bad position to sleep in. It allows your lower back to excessively arch and places your neck in a significantly rotated position. Even if you do not use a pillow, the TMJ (jaw joint) is placed under a lot of strain as the weight of your head is directly on this non-weight bearing joint. Many people will kick a leg out to the side in this position which places a lot of strain on your pelvis and sacroiliac joints. If you are having a lot of trouble breaking this habit, try sleeping with a pillow under your stomach. Make sure your belly button is directly in the center of the pillow. This will help to keep your lower back in a less-arched position. Keep your legs together and avoid kicking them to the side. Lastly, do not use a pillow.

- Side sleeping - This is a great position to sleep in, but you want to support your body differently depending on what side you are sleeping on. This is based on the fact that our body is not symmetrical; Our diaphragm (muscle that we breathe with) does not work as well on the left which causes our left abdominals to weaken (first) allowing our left lower ribs to flare, our pelvis tends to twist to the right, and our left hip tends to rotate outward while our right tends to rotate inward.

- Left side sleeping - Use a pillow that will allow your neck to stay parallel to the mattresses or causes your head to become elevated slightly (right ear should move closer to the right shoulder). Place a pillow under your left lower ribs. This helps to keep your ribs in a better position and let your diaphragm function better. A diaphragm that works efficiently will allows our neck/shoulder/back muscles to relax as they are no longer needed to help pull in air and can decrease apnic episodes! Place another pillow between your knees and try to push your right knee forward a bit forward compared to your left. This will keep your pelvis from twisting to the right and place your hip in a better position which can decrease lower back strain and irritation to the joint itself. 

- Right side sleeping - Use a pillow that keeps your neck parallel to the mattress. A small pillow can be used under your right lower ribs if you have a flare on that side or know you have abdominal weakness on both sides. The last pillow is placed between your ankles which places your left hip in a better position. Lastly, pull your left knee back a bit compared to your right in order to keep your pelvis from rotating toward the right. 

3) Doing your exercises immediately before bed can have a huge impact. Our PRI exercises are designed to inhibit overactive musculature that are holding your body in a bad position/posture and decrease pain. By performing your exercises immediately before getting into bed, you’ll be going to sleep in the most balanced, relaxed, and pain-free state you can achieve! It also helps to decrease your fight or flight nervous system and increase our REST and digest system. This can have a dramatic impact on your quality of sleep, decrease in pain, and progress in your program.

Sweet dreams! 

Written by Lesley Callaham September 18, 2018

Can't Feel The Burn In The Right Place?

burn.jpg

It's happened to all of us. You're working out and know you're supposed to be "feeling it" in a certain target area, but you can't. Do you ever wonder why?

The explanation is actually quite simple. That particular muscle is not burning because it's not firing. Why? It's not in the right position to be properly utilized. 

Our body is designed to stand with a certain posture and have our joints in certain positions. The muscles attach on very specific areas of bone so that when they shorten or contract, the bone moves in a very specific pattern. For example, our gluteus maximus (largest glut muscle) originates from the top of our pelvis and part of our sacrum at the back of the pelvis above the tailbone. It then attaches to the gluteal tuberosity on the back of the thigh bone. When this muscle contracts and shortens, your hip extends or your thigh moves backward relative to your pelvis.

The only catch is that our muscles need to have a proper length tension ratio to contract fully. This means that the muscle must not be too stretched, or too shortened in order to be the strongest that it can be and fully contract all its fibers. Therefore, if the muscle is not in the correct position, and does not have the correct length tension ratio, the body will substitute another muscle that is in better position to work. This is why people who have very arched or "deep" lower backs will feel their lower backs working as they do a glut exercise. Because of the position of their lower spine and the consequential tipped-forward position of their pelvis, their glut is stretched out. Their lower back extensors are then in a shorter position and have a much more efficient length tension ratio. Therefore, that person's body will choose to use their lower back extensors rather than their glut during their glut strengthening activities as it is more efficient from a biomechanical standpoint. 

The therapists at Integrate 360 Physical Therapists can help. We do an extensive evaluation looking at your standing posture and performing tests to see if your joints and muscles are properly aligned. We will then work with you on ways to restore your posture and bone/joint alignment so that you can work out and live in a biomechanically correct way. Depending on your goals, this can be done in as little as one session!

Next time your doing a leg raise while lying on your side and you feel it in the outside of your thigh versus your glut, or performing lower abdominal exercises that you feel in the front of your hip joint, give us a call and let us help you. Contact us at Lesley@Integrate360PT.com, Nancy@Integrate360PT.com or 314-733-5000.

Why Does Everyone's Right Shoulder Droop?

IMG_4695 (1).JPEG

What do you notice in the above picture? At first glance it just looks like three boys hanging out during a soccer game. They're all wearing different clothes and are different heights. Two of the boys are leaning on one another while the third stands independently. Despite their differences, they are all standing with the same postural pattern. 

Take a look at them, no matter how they are leaning, they are all standing on their right legs, crunching or shortening the right sides of their trunks, and lowering their right shoulders. Doesn't this seem weird considering two of the boys are leaning in opposite directions so they can lean on one another? How does that happen?

This common pattern is due to our naturally-occurring anatomical asymmetry. It begins with the asymmetrical attachment of our diaphragm. This primary muscle of respiration attaches to the back part of our lower ribcage and onto the front of our lower (lumbar) spines. The attachment sites are bigger and more robust on the right side. As this side has more attachments, it is "stronger" and tends to pull our lower spines into right rotation. Eventually this will pull our pelvis into right rotation as well. When our pelvis' and lower spines are oriented toward the right, our right hip joint is in a better, more functional position to weight bear. Therefore, we all tend to put more weight on our right leg than our left. 

Additionally, this muscle is asymmetrically domed. Because of our heart, the left side of our diaphragm tends to flatten which flares our ribcage and weakens our abdominals on that side. The liver, on the right side, helps to preserve the muscle's domed shape here. This makes the right side of our abdominals stronger than the left. Due to this and the flared ribs on our left side, our trunks tend to lean to the right. This gives us the classic lowered right shoulder. Complicating matters, when our trunks lean slightly toward the right, more weight is displaced onto the right leg. This further ingrains our postural asymmetry. 

In PRI language, this is called a Left AIC (anterior interior chain) position and it is the most common postural pattern. As our bodies spend more time in this position and our compensatory strategies we use due to this pattern break down, we tend to go further into compensatory patterns and this Left AIC pattern can degrade into others. To read more about this, check out our blog post What's Your Postural Pattern. This poor postural pattern, and therefore problematic loading on our muscles and joints, can lead to pain and dysfunction. A PRI trained therapist evaluates the entire body and it's systems to look for musculoskeletal position and function. We can then intervene on not only the area of pain, but also all of the surrounding areas that are feeding into the problem. Because of this more holistic approach, we are able to bring relief to many patients that have "failed" with physical therapy before, no matter where the site of pain is.

Next time you're at the mall, restaurant, or airport, watch people as they stand. Typically, no matter where they are looking, what direction they're learning toward, or what side they may be holding a heavy bag or purse, they'll likely be standing on their right leg with their right shoulder low. 

Why Your Orthotics Don't Work

orthotics.jpg

Many of us have had some experience with orthotics. Most of us have purchased a cheap, off the shelf variety that we purchased on a whim or were suggested to us by a shoe salesman. Others of us have purchased the expensive, over the counter, "customizable" variety that you heat up in the oven and step onto as they cool, making a mold around your foot. No matter what route you took to get there, I'm guessing that your symptoms either worsened, lessened temporarily, or moved to another place in your body. 

Why? All of those orthotics are simply putting a band-aid on the problem and may not be any better for your body than if you were walking around barefoot all day. Any time you chose a shoe and what may be going inside of it, your anatomy, your compensatory patterns, and your pain need to be taken into account. Otherwise you're either putting your foot in a different, but still not properly aligned position. This will either increase pain immediately or after some time as your body adjusts its compensatory pattern and develops breakdown.

No matter where your pain is, the position and function of your entire body needs to be assessed to see where the breakdown in your movement is. The site of pain is not always the site of the dysfunction. For example, someone may be experiencing neck pain and headaches because they keep all of their weight on their toes and lock their knees. This moves their center of gravity forward causing their hips to move forward while their shoulders lean back to rebalance themselves. The head will then move forward so that they can see the world in front of them. This places excessive stress on the neck muscles and will lead to pain. 

One major theme to proper position and mechanics of the entire body is the ability to sense and feel where we are in space. Our body must be able to feel where the weight is in our foot in order to tell us where our body is on the ground. Proper positioning of the ankle joint is also essential so that our proprioceptors can tell us, again, where we are on the ground and how we are moving on it as we walk. If we cannot accurately sense and feel where our body and feet are, we develop compensatory movement strategies which eventually lead to pain. 

Cheap, over the counter orthotics are a "shot in the dark." The chance that the amount of arch support that is built into the orthotic is actually the amount we need is unlikely. The "customizable" over the counter orthotics that are heated in the oven simply support your foot in it's improper position. This is also how corkbedded shoes work. They are typically very comfortable, but as they support you in your dysfunction, your compensatory pattern will only worsen and you will eventually experience you pain again. Rigid orthotics do not work because they do not allow your foot to change from a "loose bag of bones" that is needed when your heel first strikes the ground (this is needed for your leg to appropriately absorb the force the ground exerts on you leg at initial impact) to a rigid lever that is needed when you're pushing off of your toe of your back foot. It also doesn't allow your foot to feel and sense and change in pressure as your weight moves in your foot. 

What your body needs is to sense and feel the floor. The first line of attack to achieving this goal is to be sure that you are wearing the approparite shoes for your feet. Some people need more guidance for their foot while others need the motion of their foot to be controlled as they walk. If appropriate footwear will not solve the entire problem (likely to due a structural change in the foot or ankle from surgery, fractures, arthritis, etc), orthotics may be appropriate.

The orthotics made at Integrate 360 are made of a dense foam and are customized to each of your feet. We take measurements of the foot and ankle, pictures of the alignment of the foot in relation to the lower leg, and impressions of your feet. The orthotics are made by Dr. Paul Coffin with respect to your PRI rehabilitation goals. Once you receive your orthotics, they will have been made to support your foot/ankle where they need some assistance and, more importantly, allow you to sense and feel certain areas of your foot as you walk. This is essential as your brain needs to sense where you are on the ground to activate your muscles appropariately. This allows your underactive muscles to turn on, while keeping overactive muscles off. From here, your therapist now has a "blank slate" to help teach your body to use these cues appropriately, strengthen "weak" muscles, and help your body to learn to move in a balanced way again. 

Just by changing either your footwear or orthotic, your body is now able to regain proper joint/muscle position and restore reciprocal movement allowing for perfected mechanics versus putting a band-aid on their symptom. 

Interesting in an assessment to see what will fit your needs? Call Integrate 360 Physical Therapy at 314-733-5000 or email Lesley@Integrate360PT.com or Nancy@Integrate360PT.com

What's a Rib Flare and What Does it Mean?

rib flare.jpg

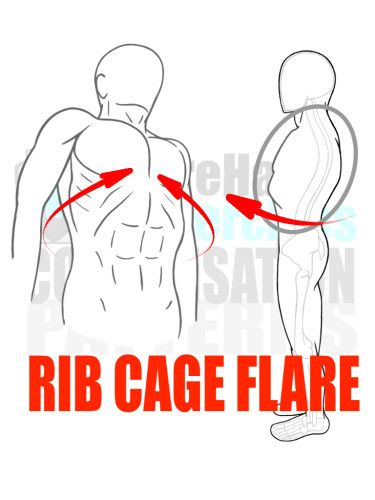
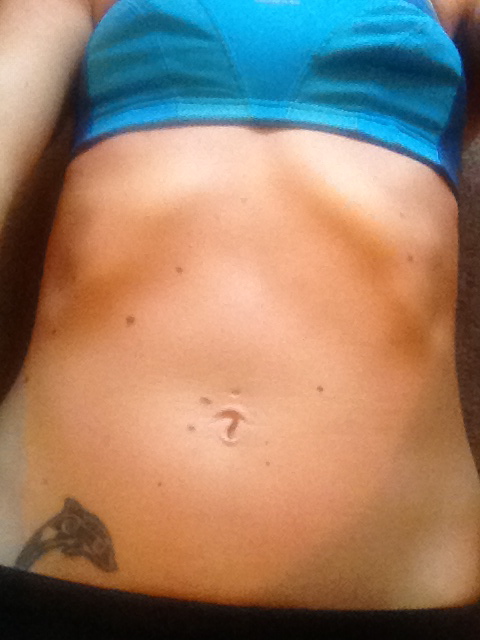
Next time you're lying on your back, place your hands on your lower ribs. As you move your hands down those ribs toward your belly button, did you notice a drop off as your ribcage ended and your hands moved onto your abdomin? Was one side worse than the other? You, my friend, have a rib flare. These are very common, but are not normal. They are a clear warning sign that your core strength is lacking and you are on your way to pain and/or dysfunction.

rib flare person.jpg

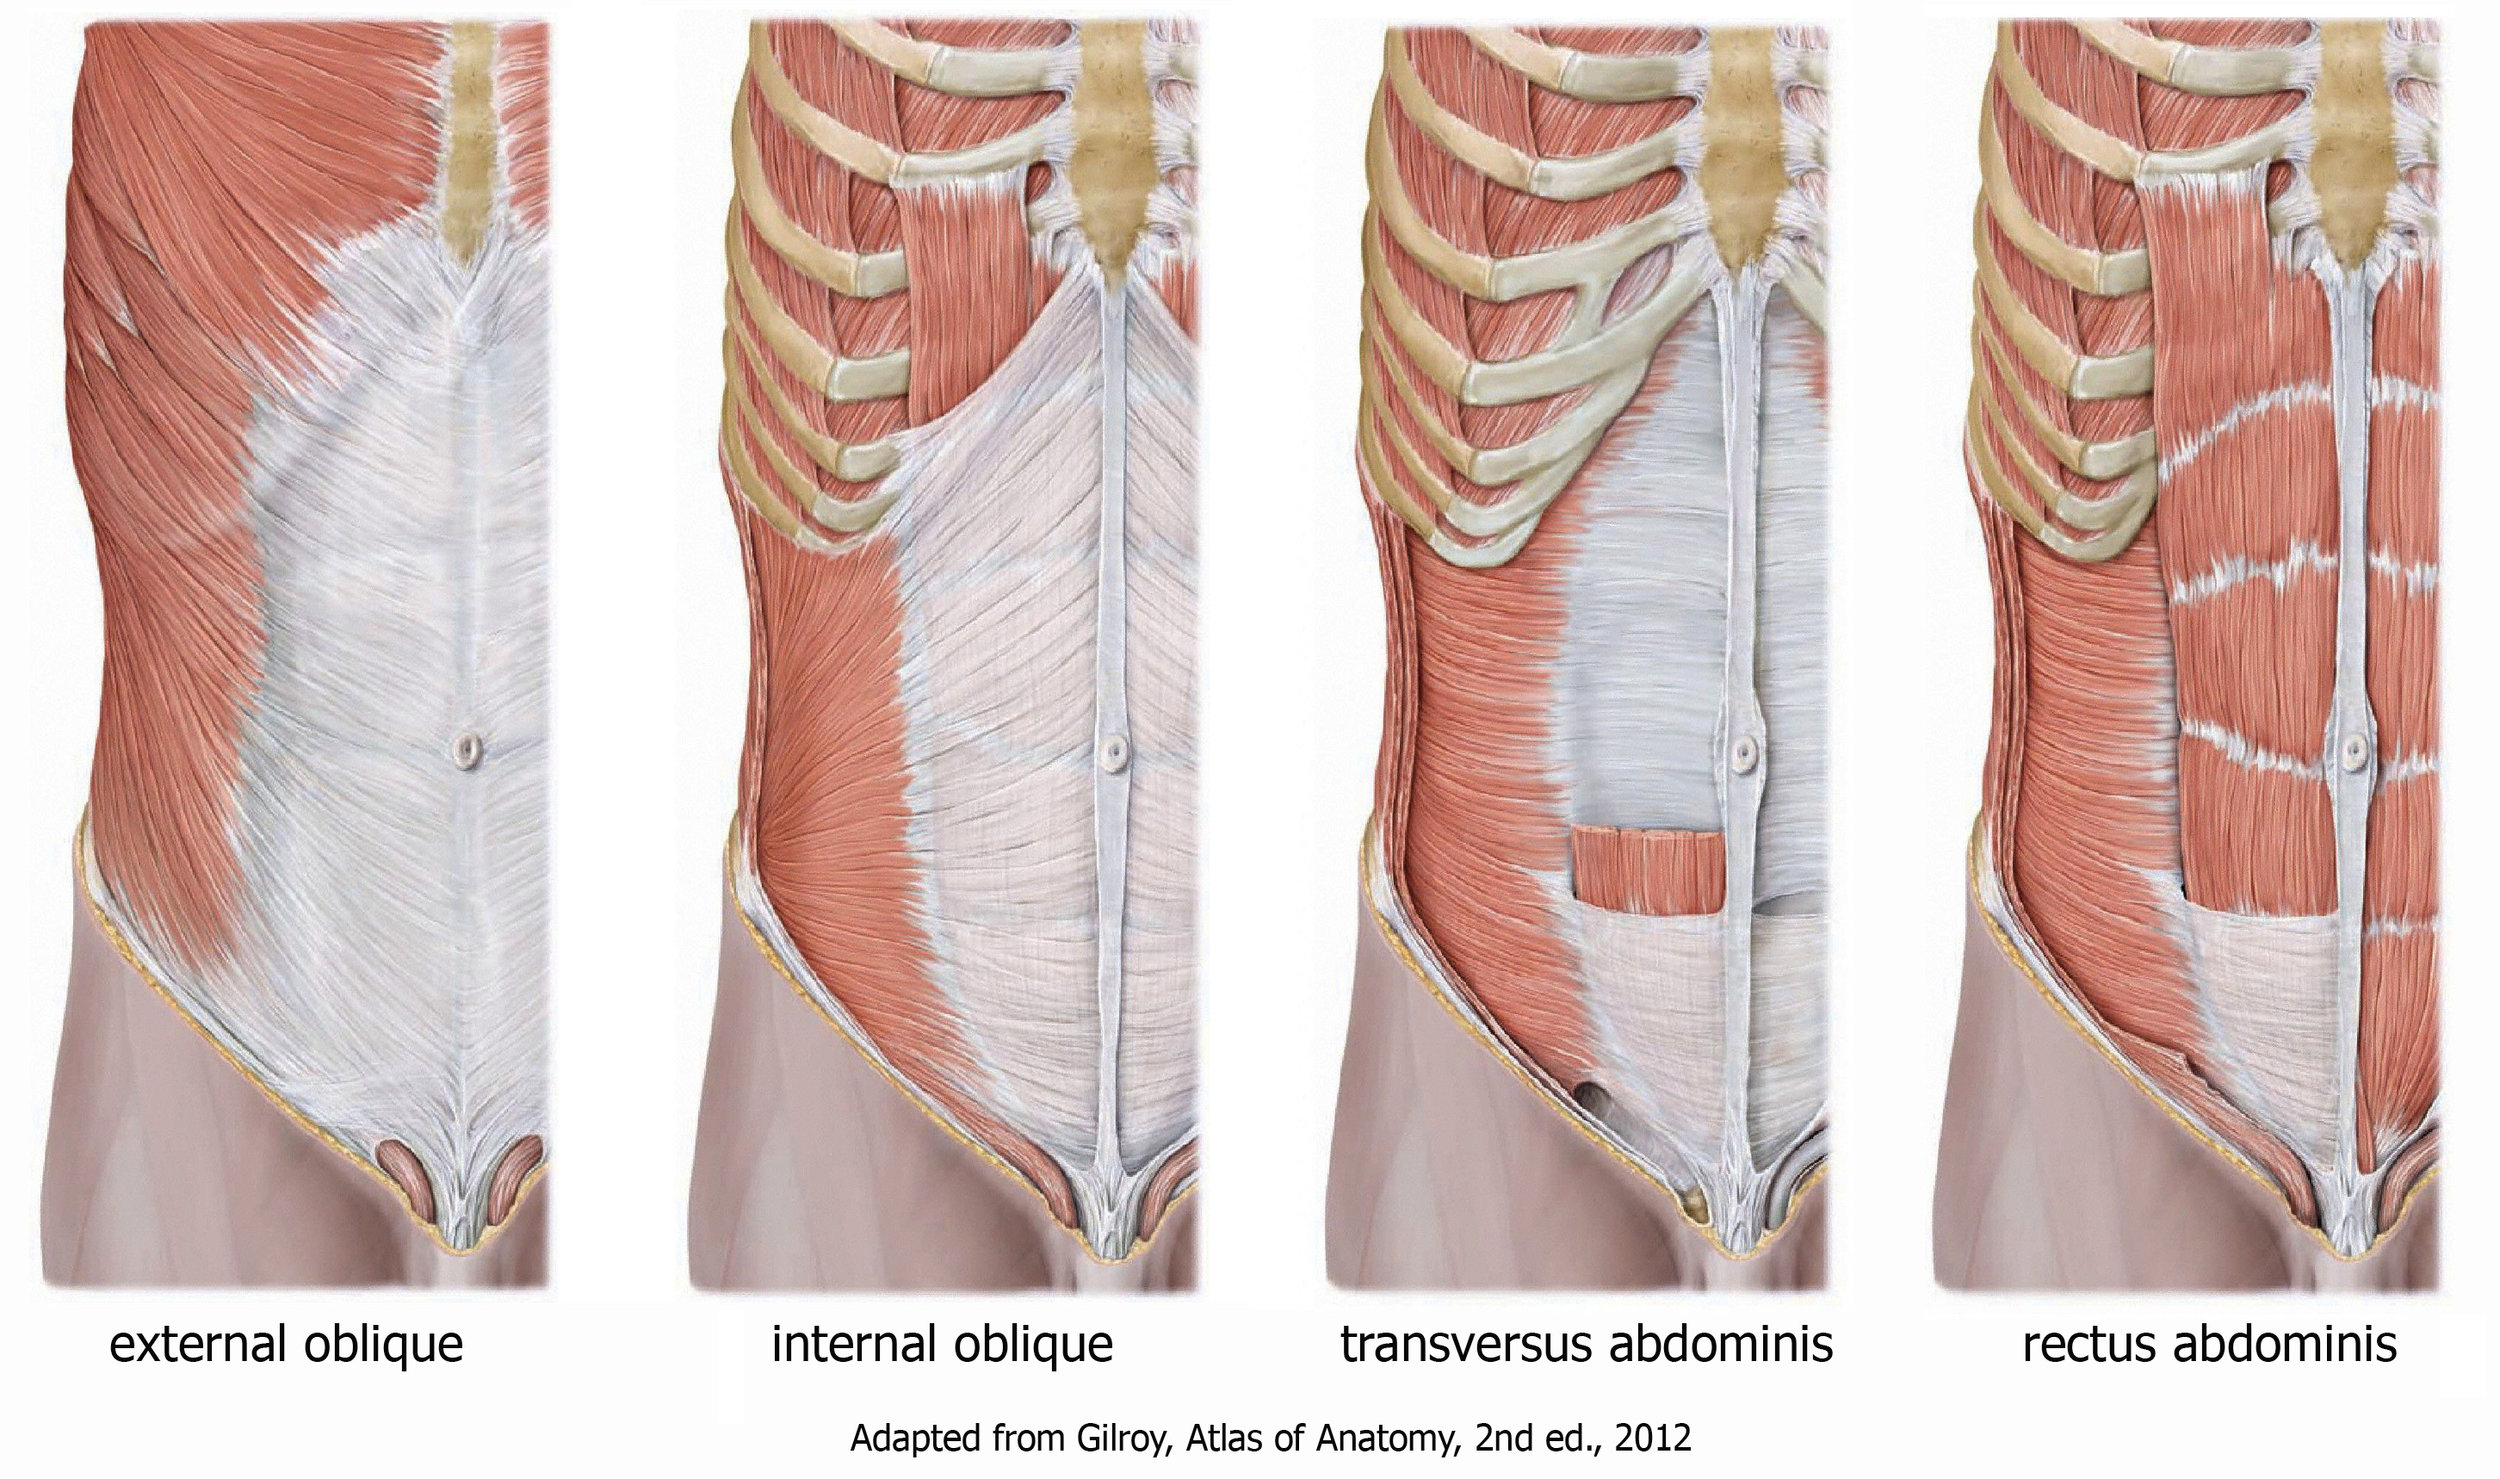
Our abdominal muscles all attach to the bottom part of our ribcage.  The rectis abdominis (or six pack muscle) attaches to the ribcage in the front where it then travels down an attaches to the pelvis in the front. This muscle curls the trunk forward and is NOT a postural, or true core, muscle. It is also the most superficial muscle.

The next two groups are deeper toward are spine and do function as postural muscles. These are the obliques, specifically the internal obliques, and the transverse abdominis. These groups of abdominals are much wider and also attach to our lower ribs and top of the pelvis, but touch more bony surface area. When these muscles are strong and have good resting tone, they keep the ribcage held in an upright position. When these muscles become weak, they allow the front part of the bottom of the ribcage to flare upward and outward. The entire ribcage becomes extended which flattens out midback, overly arches our lower backs, cause our heads to more forward, and disallow good ribcage motion with walking and breathing. This can cause any number of issues- headaches, neck pain, shoulder problems, lower back pain, etc. 

abdominalwallmuscles.jpg

This also causes our diaphragm to move from a functional, domed position (similar to that with a held exhalation), to a flattened, ineffective one (similar to that with a held inhalation). When the diaphragm loses it's "zone of apposition" that would normally be maintained with good abdominal strength, we cannot effective breathe with it. When we cannot breathe with the diaphragm, the primary muscle of respiration, we must find other ways to get air into our lungs. We can do this many ways: extending our lower backs to open up our abdomin, using our neck muscles to try to lift the ribcage upward, or a combination of the two. This is how pain develops. 

To fix this, the internal obliques and transverse abdominis muscles need to be targeted. Not only does the rehabilitation effort need to be very targeted, it needs to be functional, i.e., it needs to be done with proper breathing mechanics. We must return the position of the diaphragm to one of a functional, domed, exhaled position. The only way to properly do this is with your internal obliques and transverse abdominis. 

It is not possible to fully rehabilitate and restore core strength and control without proper respiration and abdominal strengthening at the same time. 

This is the foundation of any PRI treatment plan. Proper respiration cannot occur without a functional core, and a functional core cannot happen without proper respiration. Let the therapists at the only PRI certified clinic in St. Louis help you to restore your function and reduce or eliminate your pain. Call us at 314-733-5000 or email Lesley@integrate360pt.com or Nancy@integrate360pt.com