The Best Way to Sit

1.jpg

Whether you're back to sitting waaaaaay too much because you're back in school or it's just a normal part of your work day, you might as well choose to sit in a way that will best avoid pain and promote good musculoskeletal alignment. 

These recommendations are based on the postural patterns we assume when we are not musculoskeletally stable (i.e. Are experiencing pain or poor posture) as defined by PRI. They are for someone presenting as a left AIC and/or right BC person (Don't remember what that means? Review it here). These will be most impactful after seeing a therapist at Integrate 360 for a thorough evaluation. Not only will this let you know what pattern you are in, we can customize the recommendations for you - no guess work!

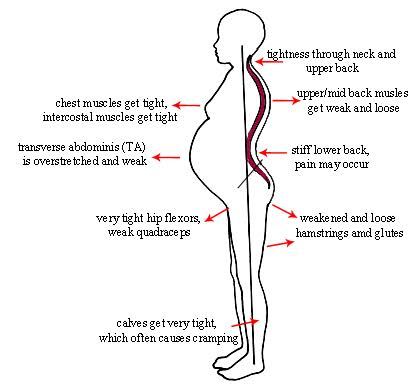
1) Sit with your knees at hip height or higher. This allows your pelvis and lower back to stay in a neutral or slightly rounded position. Most furniture is made for people who are 5'8". If you are shorter than this, your knees are likely lower than your hips. This pulls your pelvis forward which will arch your back and create pain. You can always put a footrest, or even your backpack, under your feet to bring them up. Also be sure to get rid of any lumbar support or roll you may be using. This will put your lumbar spine in too much extension or arch.

2) Feel your heels. Make sure that your heels are in contact with the ground. Pushing up onto your toes and not being able to get your heels to the ground subconsciously tells your brain to activate the calves and other extensor muscle groups. This sets your body up for failure when it's time for you to get up and move. Your brain is not prepared to use all of your muscle groups appropriately to move you forward. Plus, if your heels cannot reach the ground, there's no way your knees are at hip height.

3) Shift your left hip back. Pretend there is a spool of thread between your knees that you are trying to pull closer toward you as you pull your left knee back toward you. Our pelvis' tend to get stuck pointing toward the right when we get out of a good musculoskeletal position. This will help to pull the pelvic back toward the left, placing it in a much more neutral position.

4) Lower your left shoulder. Our diaphragms are much stronger on the right side than the left. This causes us to bend our trunks to the right slightly and lower our right shoulder. By bending back toward the left, crunching our left abdominal wall, or simply lowering our left shoulder, we help to better align our spines.

5) Reach across your body. Because of that diaphragm position and right hand dominance, we tend to reach with our right hands a lot. Reaching with you left hand makes your brain more aware of the left side of your body which will help to keep your posture symmetrical. It will also help to keep your body moving in a reciprocal and alternating way - the way our bodies should move all of the time! Unfortunately, in this world of sustained sitting and repetitive movements, this is harder and harder to incorporate into a normal day. This can lead to repetitive movement injuries and pain. 

6) TAKE BREAKS AND MOVE! Easier said than done, we know, especially if you're in a classroom. But try to take breaks as much as possible. Get up and move around. It can be simply walking to the back of the class to the front, using the restroom, or getting a glass of water. Keeping our bodies moving keeps them healthy, and you awake!

Please contact us at 314-733-5000 or lesley@integrate360pt.com or nancy@integrate360pt.com for more information. 

How to Correctly Wear a Backpack

It's that time of year - back to school! Getting back into an academic routine can be really fun, but whether you're walking across your college campus or up the stairs at your high school, your backpack can be damaging your posture and causing a lot of pain. Here are some pointers to lessen the negative effects a backpack can cause.

1) Tighten the straps. Whenever you are carrying a heavy weight (be it a backpack, laundry basket, or groceries), it's the easiest on your body when you carry it as close as possible to your center of gravity. For us, that happens to be at belly button level in the center of our bodies. So for a backpack, you want it as flush to your back (the center of it around belly button level). Most people tend to wear their straps loosely so there's a visible gap between their lower back and the bag itself. Go ahead and tighten up the straps and feel the difference. If your backpack also has a belt that can go around your waist, that will also help to distribute the load appropriately. 

2) Use BOTH straps. It's easy to swing that bag up over just one shoulder, especially if you're in a hurry. But having this heavy weight just on one side of your body will typically cause you to lean away from the bag and forward. This causes a lot of stress on your lower back as well as makes your to contort your neck to see the world in front of you. This excess neck strain can lead to tension headaches. 

3) Don't carry so much. Easier said than done, we know, but making more frequent trips to your locker, car, or apartment so that you're carrying a lighter load will put much less strain on your body. It'll help you get to your 10,000 steps a day goal too!

4) Be careful how you lift it. As we've previously inferred, backpacks can be tremendously heavy. Therefore, it's important that you use good body mechanics when picking up your bag. If it's on the floor, remember to squat or lunge down to the bag. Then, pull it close to your body near your belly button. Next, stand up keeping that bag at belly button level. Once you're up you can move the backpack onto your shoulders. 

5) Choose the right bag. Backpacks can come in different sizes. There's also options like messenger bags and roller bags. Choose one that will be the most convenient for you understanding that, from a musculoskeletal health perspective, the best bag is a rolling one, followed by a standard two strap backpack, with the worst option being the messenger bag. If you do decide to use a messenger bag, wear it across your body so that the load is more evenly distributed across your body and not all on one side. 

Have a great year!

Hamstrings: Should You Stretch Them?

Many people suffer from hamstring sprains, strains, and tears. A lot of people think they have "tight" hamstrings. We repeatedly hear from our clients, "I've always had tight hamstrings". So the natural tendency is to stretch them. However, before you stretch your hamstrings, we suggest watching this video by Dave Drummer, DPT, PRC at the Hruska Clinic. In this video, Dave explains the importance of proper position of the pelvis for hamstring length and strength. If the pelvis is in the proper position, the hamstrings should have adequate length. At Integrate 360 Physical Therapy, we have objective tests that tell us if your pelvis is in the proper position. If a client has limited hamstring length once the pelvis is in the proper position, we will teach them hamstring stretching activities in a specific position. If you suffer from chronic hamstring injuries or would like to know more, please contact us at 314-733-5000 or email lesley@integrate360pt.com or nancy@integrate360pt.com.

The $100 billlion per year back pain industry is mostly a hoax - an article review

"The $100 billion per year back pain industry is mostly a hoax" is an article that summarizes the thoughts and views of Cathryn Jakobson Ramin in her new book, Crooked: Outwitting the Back Pain Industry and Getting on the Road to Recovery (read it here).

In her book, Ramin expresses that most proceedures and treatments to ease back pain are not effective and can sometimes create additional back pain. She mentions things like lumbar fusions, discectomies, opioid medication, even chiropractic adjustments. She eventually reveals that the only treatment that can reliably ease back pain is to move. Within the section discussing chiropractic, she reports that "adjustments" can temporarily decrease pain due to a rush of adrenaline, but the manipulation involves pushing a joint past it's biomechanical range which is contraindicated for many health conditions. Some chiropractors have adjusted their intervention-style. ""They have restyled themselves as rehabilitation specialists,” which means they’re training patients in effective back-strengthening exercises as a reliable physical therapist would, she tells Quartz, “and are doing a great job with it.”"

From a physical therapy standpoint, this article is great news! According to Ramin, many surgeries and proceedures patients undergo in order to ease their back pain is either not effective or, at best, have a placebo effect. As movement and strengthening exercises seems to be the most effect way to manage and heal your back pain, everyone has the ability to alleviate their pain. 

Although we don't tend to agree that subluxations and poor musculoskeletal positions cannot anatomically happen because they can't be seen on x-ray, Integrate 360 Physical Therapy has the tools you need to become pain-free including repositioning joints and musculoskeletal structures.

When we evaluate a patient whether it's their first or tenth visit, we assess how well the body is able to move both passively and actively. We look for malposition, subluxations, joint and muscle range of motion, muscular strength, etc.

Once we have finished this assessment and educated you on what is causing the pain and how we're going to work together to fix it, we get to work. We typically start with some form of "repositioning" activity. Afterward, we assess your body's ability to move again as well as your alignment. If something is still malaligned, we may choose to reposition the structure with manual mobilization or muscle energy techniques (a specific movement within a specific position where you use your muscles strategically to pull yourself into proper position - kind of like an adjustment that you do yourself). We then continue to work on restoring the strength and balance of your body. 

These interventions will likely remedy the pain in and of themselves, but sometimes we need to encourage our patients to be more physically active overall, or just like the article mentions, move more. Now that we've addressed pain, posture, alignment, and strength in our sessions, your daily walks (or whatever way you chose to move) will be much more effective and/or can be participated in as it no longer causes pain.

Let the therapists at Integrate 360 Physical Therapy help teach your body how to move correctly to eliminate pain now and prevent future pain. Call 314-733-5000 or email us at either Lesley@integrate360PT.com or Nancy@integrate360PT.com

Running - Can It Do More Harm Than Good?

It's officially running season! For so many people it's their preferred method of exercise - it's cheap, can be done anywhere, great for cardiovascular fitness and calorie burning, etc. However, important to make sure this activity is actually benefitting you and isn't going to causing you problems down the line. 

It's important to acknowledge the fact that running is very repetitive. Your body is constantly moving forward, therefore, your limbs are constantly moving in the same way and your trunk is held comparatively static. This can cause overuse injuries of muscles or joints - most commonly shin splints, ITB irritation, hamstring tendinitis, hip bursitis, or groin pain. As your body is moving in one direction, it only moves in one out of the three planes of movement. Therefore, the muscles that control joint and bone motion in this plane are the ones that tend to become overly active and breakdown when problems arise.

How do we fix this? We need to make sure that our bodies move in ALL THREE planes of motion! This can be done in many ways. First of all, taking steps to ensure activation and motion in the other planes of motions is paramount to maintaining a healthy body. Postural Restoration is a form of physical therapy makes this tri-planar motion the heart of our rehabilitation effort. When you come in for your evaluation at Integrate 360, we assess your body's musculoskeletal position and integrated strength. This will help us assess where the body is not moving appropriately and restore strength throughout the body so all of the parts work together well.

We will also make sure you are able to breathe appropriately when running. Not only does proper use of the diaphragm dictate whether or not tri-planar motion is even a possibility, but compensated breathing patterns stress other muscles of the body as well as limit your cardiovascular endurance. If you are not able to breathe comfortably through your nose and out of your mouth for the duration of your run, you are not allowing yourself to achieve maximum performance and setting yourself up for an injury in the future.

Wearing appropriate running shoes is also a game changer. Not any running shoe will do. They need to have the proper amount of structure that your foot needs to maintain a good, stable foundation for the rest of your body to work off of while running. Not only will the shoes set you up for mechanical success, they will also help your feet to feel where they are on the ground and help to activate and/or inhibit the proper muscle groups at the appropriate time.

Having the right glasses or contacts in while running also makes a significant difference. It's important to have a prescription on that allows your to see distance well. This allows you to see the world around you which allows your body to anticipate the environment ahead and prepare on how to handle it from a mechanical standpoint. Proper distance vision also allows your body to "unlock" or "relax" and promote tri-planar movement. If you're using monovision contact lenses, progresses lenses, or even bifocal lenses, you could also be setting yourself up for compensated movement and a future injury.

For more, check out our recommended shoe list here.

What are some things you can keep in mind while running to promote tri-planar movement? Look at this list of tips from the PRI website here.

Want an evaluation to see the current condition of your body and personalized rehab to get on your A game? Call Integrate 360 Physical Therapy and 314-733-5000 or email Lesley@integrate360pt.com or Nancy@integrate360pt.com

Diastasis Recti - What You Need to Know

As we discussed at the end of our last blogpost, there are a lot of problem that crop after a woman has delivered her baby. These can include incontinence and pelvic pain (read our previous blogpost here for more information on that) and diastasis recti. These are signficant issues that need to be addressed as soon as possible since they signal a complete failure of at least one part of our core and can lead to severe pain problems and dysfunction. As we've already addressed the pelvic part of this dysfunction, today's blogpost will focus on diastasis recti.

First of all, let's discuss what it is. One of our abdominal muscles is our rectus abdominis (aka the "six pack muscle") which flexes or curls our trunk. The left and right side of this muscle is held together by some connective tissue called the linea alba. The diastasis recti occurs when the linea alba is over stretched or breaks. This most commonly occurs during pregnancy where the abdomin grows very large in a relatively quick amount of time. It can also occur with excessive abdominal circumference or adipose tissue or possibly with the overuse of the Valsalva maneuver (read our blogpost on that here.)

This is most commonly diagnosed by a healthcare professional. The patient will lie on their back with their knees bent and feet flat on the floor. They will then lift their head off of the ground to activate the rectus abdominis muscle. Once, activated the left and right side of this muscle should be easily palpated. If the space between these sides is wider than 2 fingertips, it's generally considered that they have a diastasis recti.

Why is this important? This finding suggests that at least a quarter of your core muscles do not function as they should. Think of a closed can of coke. You can squeeze it as hard as you want and you will not be able to pop the can. However, prick a hole in the can with a needle, and you'll be able to crush the can with enough pressure from your hand. The rectis abdominis is the pinprick in the soda can. Now that your core is damaged, you will not have the intrinsic core stability needed to do more normal activities in a biomechanically correct way. This will lead to compensations and further breakdown of your body until you're left with a loss of function or development of significant pain.

Physical therapy is the leading intervention for a diastasis recti. Typically, therapists try to work out the abdominals in a "safe" manner to restore our core strength. In our therapist's experience,t this is a bandaid on the problem and although it can ease pain in the short term, it does not correct the problem as much as possible.

At Integrate 360 Physical Therapy, we treat this issue is a very holistic manner. We look at the position and function of the entire body to see what is feeding in to the dysfunction. Typically, we find that the lumbar spine is too arched or overextended which places the pelvis in a tipped forward position. The rectis abdominis attaches to your lower ribs and the front of your pelvis. When your pelvis is tipped forward, the muscle is elongated and subject to "stretch" weakness which means it cannot work very well. We utilize repositioning activities to help restore normal spinal position. From there, we not only activate the rectis abdominis, but we restore true core strength through utilization of the transverse abdominis and obliques to support the rectis abdominis and take additional strain off of this tissue. We also focus a lot on proper breathing patterns so that the diaphragm can be appropriately utilized. This will help to reduce pressure on the diastasis recti and support proper posture. Assessing and intervening on all of these areas is what allows us to "heal" our patients more completely than in traditional settings. 


Pregnancy and Pain: How Physical Therapy Can Help

Pregnancy is a journey and as time passes, you'll likely experience some sort of musculoskeletal pain. Additionally, that pain is likely to evolve and change as your pregnancy progresses. Some common complaints women have during pregnancy are low back pain, pubalgia (pain in the pubic bone right behind your zipper), sciatica (pain into the buttock and/or leg), rib pain, and pelvic pain. Although these issues arise as your body changes from the pregnancy, there's no reason to wait it out - nine months is a long time to hurt! There are many ways in which physical therapy can help.

Let's start with discussing how the body changes during pregnancy. As the baby grows, so does your stomach. As it grows further outward, your center of mass shifts forward and your pelvis widens. To compensate for this we tend to bear more weight through our toes, lean back, and let our legs rotate outward. These compensations cause us to overutilize our piriformis muscle and other hip rotators, lower back extensors, and calves. Leaning backward will also close the facet joints in our lumbar spines (lower backs) and can cause nerve entrapment and pain. These postural changes and the weight of the baby itself will cause our pelvic floor to work harder which can cause muscle spasm and more nerve entrapment. On top of all of this, ligaments in our bodies naturally become more lax as pregnancy progresses so that the baby can move easily through the pelvis. This is good news during delivery, but can cause skeletal malalignments and additional pain. 

Postural Restoration Institute-based physical therapy can help ease this pain as our interventions address all of these issues at one time. PRI focuses on flexing the lumbar spine and moving the center of gravity as far backward to its normal position as possible. This opens the lumbar facet joints and can relieve a great deal or lower back and/or leg pain. As our lumbar spines return to a more normal position, our legs will also return to a more normal rotational angle. This takes a great deal of strain off of the hip rotators that may be causing pain in the buttock region, but those muscles may also be compressing the sciatic nerve causing leg pain. Lastly, when our center of gravity moves backward, we can bear more weight through our heels as intended which will alleviate calf or foot pain. 

How does this happen? We utilize many positions in which to exercise to achieve maximum results. We tend to gravitate toward activities that involve lying on your side or on your hands and your knees as those allow us to isolate areas of the body and specifics muscles that we want to effect. This also unweights your pelvis and allows areas like your pelvic floor to relax for a bit. To make things more functional, we will reposition and strengthen in standing as well as long as our patient can tolerate it. Additionally, we do have modalities and various manual therapies to help us along in our goal of reducing your pain that can be utilized as needed. 

Think pregnancy-related issues stop once the baby is born? Unfortunately no, there are a multitude of problems that can arise aftward as well. Stay tuned as we discuss this topic in next week's blog post. 

Want to address your pregnancy-related pain? Call Integrate 360 Physical Therapy and 314-733-5000 or email lesley@integrate360pt.com or nancy@integrate360pt.com

Why Holding Your Breath Can be Detrimental to Your Health: The Dangers of the Valsalva Maneuver

We all do it whether we're conscious of it or not. We hold our breath when exerting force. Most commonly, we do this while defecating or performing a strenuous task like lifting a heavy weight. Some of us do it more frequently, and may do it when we're stressed or simply bending forward to pick something up.

Why do we do it? Most of the time we're doing it to essentially compensate for a lack, or add to, our core stability. Outside of extreme weight lifting, this is a bad plan! First of all, it's a compensation and in order to perform the activity in the most functional, pain-free, and mechanically correct way, we need to engage our core properly before and during the activity. Secondly, it has tremendous physiological impacts and cause lightheadedness, dizziness, or syncope (passing out).

The Valsalva maneuver occurs when we forcibly exhale against a closed glottis or throat (again, think defecating). This causes multiple things to happen: intra-abdominal and intrathoracic pressures increase. This excessive pressures cause compression of the vessels of chest, including the aorta, and decrease venous return and carbon monoxide levels. It will also drastically slow heart beat and increase sympathetic (flight of flight nervous system) activity by stimulating baroreceptors. To combat this and maintain perfusion and carbon monoxide levels, heart rate and blood pressure will rise. When the maneuver ends (when we finally breathe out), venous return and carbon monoxide quickly rise and intra-abdominal pressure plummets causing a significant stress on the heart. These effects can be particularly dangerous for the elderly, anyone with heart or blood pressure conditions, and pregnant women.

This can also lead to incontinence issues or pelvic pain for both men and women. When we forcibly exhale this way, our pelvic floor muscles naturally contract to combat the increase in intra-abdominal pressure and keep our organs and urine/feces inside our bodies. If/when we accidentally leak a little urine during this activity, we have had a failure of the pelvic floor and need to seek rehabilitation quickly in order to nip this problem in the bud. If this is not addressed, the incontinence can worsen or we can develop pain in our pelvic floor (especially during sex for women), hip, or lower back area.

To that point, a Valsalva should never be used while using the bathroom. In that situation, the point is to pass urine or feces through our pelvic floor and let it leave our bodies. We do not want to start that motion with a contracted pelvic floor. Not only will that make evacuation much more difficult, the increase in pressure can head to hemorrhoids or tearing of skin/muscle. It is also bad mechanical training. We always want to reinforce a pelvic floor contraction with keeping things in the body, the muscles need to relax to release things out of it. Practicing bad form while going to the bathroom confuses the muscles and can create problems.

Lastly, this causes increased stress on other areas of the body and can create a pathology. When we take that large inhale before we hold our breath, it extends our thorax on our lower back. When we hold our breath, our thorax is locked in this pattern during the duration of the exercise. This places our abdominals in a lengthened position and make it hard to properly utilize, activates our lower back extensors and forces them to do most of the work stabilizing our spine, and places the balls of our arms and hips in an improper place in the sockets. When you then try to use your shoulders to lift that laundry basket, or squat down to pick up that dropped item, the muscles surrounding that joint aren't able to be properly activated and can cause injury or pain.

How do you combat this? Simply remembering to exhale (through either your nose or mouth) when you're moving, especially when you're straining is a good start. For people who have been doing this for some time may notice that this is a particularly hard pattern to break, or that they feel much weaker if they aren't holding their breath. For those individuals, respiratory, diaphragmatic, core, and joint stabilization training need to be implemented.

Call us at 314-733-5000 or email Lesley@integrate360pt.com or nancy@integrate360pt.com for more information or to start your retraining process.

Can a Frozen Shoulder be Healed Quickly and Without Stretching?

We put these before and after photos on our facebook page last week and it practically went viral. We thought you all may want to know more about this woman's journey so we thought we'd fill you in. We're going to call her Sally for the rest of this article - not her real name, of course.

Sally came for her first appointment earlier this year. She reported that she was in a car accident years ago that left her with neck pain. Shortly after she was treated by a physical therapist who alleviated the neck pain completely. When she was caring for her baby the year after, she started noticing the return of her neck pain as well as left arm pain, decreased range of motion, and decreased function of her arm. A little while later she tried physical therapy and did not notice any change in her symptoms or function.

At her first visit she had pain and burning between her left shoulder blade and spine, left sided neck pain, and her head felt heavy.

Here's what we noticed in her first session:

  • Standing posture: flattened thoracic (upper back) and cervical (neck) spinal curvitures, right shoulder blade low and unstable, right shoulder low
  • Muscle strength: right shoulder strength was 5/5 and pain free, her left shoulder was generally weaker at a 3/5 and unstable. The head of her arm bone could be heard clunking in the socket as we applied pressure.
  • Alignment: left rotated cervical spine and malalignment of her left first rib
  • PRI: Poor hip positioning and muscular control of the hip on both sides, approximately 6 inches from her toes when bending forward
  • Range of motion: decreased active and passive shoulder range
    • active left abduction 90,  flexion 120 (both out of 180)
    • passive left abduction60, flexion 120, internal rotation 55, external rotation 90 (rotations are out of 90). She also had limited right flexion at 125

Her treatment consisted of a lot of education and only one exercise. This exercise put her on her back and facilitated her hamstrings, abs, and promoted diaphragmatic breathing and getting breath into her right upper chest. After this activity she had proper hip positioning on both sides, restored cervical and first rib alignment, full left shoulder internal rotation and improved flexion by 30 degrees (150 total)


In her second appointment (9 days later):

  • She had not had any shoulder blade burning pain at all since the first session. She continued to have some left neck pain and pain into her left shoulder when she moved it, but the intensity was much better than before. She had not done her exercise in the previous 2 days.
  • PRI: good hip positioning on both sides, poor muscular control of the hips on both sides, integrated strength 3/5 on the left and 1/5 on the right
  • Alignment: unremarkable
  • Range of motion:
    • active left shoulder flexion and abduction 160 (out of 180) with significantly less pain at the end of her range
    • passive shoulder internal rotation 90 on both sides, flexion 145 (out of 180) on both sides

Her treatment in this session was to progress her previous exercise into one in standing while supported by a wall. We also added a reaching component with her left arm and made her breathe into a balloon. This moved her into a much more integrated position as she now has to control all of the joints of her body while standing and performing an exercise. The right arm reach and addition of the balloon helped to strengthen her abdominals both concentrically and eccentrically, especially on the left side. This improved her shoulder flexion to 160 on the left, and 165 on the right (out of 180)

We also added a strengthening activity for her left inner thigh while lying on her right side. This improved her integrated strength score to a 2/5 on the left side.


In her third session (11 days later):

  • She had no shoulder blade or neck pain at all. She felt that she had full left shoulder range of motion, but had a bit of tightness at the end of her range
  • Muscle strength: left shoulder 5/5 and pain-free without any clunking of the head of her arm bone in socket
  • Alignment: unremarkable
  • PRI: proper hip position and good control of hip joint on both sides, limited hamstring motion, 5 inches from touching toes when bending forward, integrated strength 3/5 on both sides
  • Range of motion:
    • active left shoulder flexion and abduction 180 (full range)
    • passive shoulder flexion 180, internal rotation 90, and external rotation 90 on both sides (full range)

In this session we added a hamstring stretch which allowed her to reach further toward the floor while bending over. We tookaway the support of the wall in her standing activity from the session before and made her reach with her left arm to strengthen the left abdominals in both positions of ribcage rotation. Lastly, we added a rotator cuff and scapular strengthening activity in sitting being careful to maintain a good ribcage position and breathing pattern throughout the exercise. This will help to stabilize her shoulder blade position and head of her arm bone in the socket. 

At this point, Sally was completely pain-free, hadfull left shoulder range of motion, and much improved postural alignment. We could discharge her at this point as her therapy goals had been met, but we have seen her a few more times to fully stabilize her posture and left shoulder/shoulder blade so that her symptoms do not return.


Interested in learning more? Want to maximize your results even if you've had unsuccessful physical therapy in the past? Call Integrate 360 at 314-733-5000 or email us at Lesley@integrate360pt.com or nancy@integrate360pt.com


The Best Sleeping Positions for Your Body

Sleep is something most Americans have some trouble with, particular if they're in pain. A vicious cycle develops where our pain wakes us at night, then we're more painful during the day because we're not properly rested. It's important to restore restful sleep as quickly as possible in order for our bodies to heal and repair our injury. It's important to be sure your body is properly positioned while you sleep to avoid replicating painful patterns or positions that we are in during the day. This will help us avoid night pain, get a more restful night sleep, and speed us forward in our rehabilitation efforts.

If you've already seen a therapist at Integrate 360 Physical Therapy, you probably already know what pattern you tend to fall in (read our summary of patterns here if you cannot remember). This will help you determine your best sleeping position. If you are a left AIC or are not sure what position you're in, try the following guidelines:

Lying on your left side: Chose a pillow that supports your neck and feels comfortable but that places your head a little bit higher than your spine. Lie with a pillow under your left lower ribs, and a pillow between your knees. Try to rotate your top hip forward so that your right knee is slightly ahead of your left.

Lying on your right side: Chose a pillow that supports your neck and keeps your head level with your spine. Place a pillow between your ankles and pull your top hip back so that your left knee is slightly behind your right.

See pictures of the sidelying positions at the bottom of this handout.

Lying on your back: Sleep with a very thin pillow behind your head so that your neck is aligned with the spine of your middle back. A pillow with too much support will push you head forward or up toward the ceiling too far. Sleep with a pillow or two, or even a small ottoman, under your knees. This will keep your pelvis rotated backward and take the stress off of your lower back and front of your hips.

This positioning helps to combat a left AIC pattern and can be very helpful for some PEC patients as well. Remember that in a left AIC pattern, the pelvis is stuck in right rotation, left ribs are flared, and neck is left sidebent. The above position helps to take you out of this pattern and all over-stressed structures to relax.

If you are a PEC or the above positions are not comfortable for you, try keeping your neck level with your spine no matter what side you are sleeping on. You may also try to move the pillow between your ankles no matter what side you are on. If that doesn't help your back or hip pain, try simply moving the pillow between your knees and do not worry about either knee being ahead of the other.

Try very hard to avoid: sleeping on you stomach! This puts our lower back in a lot of extension and makes us turn our heads to a very sharp angle. This is just plain hard on our bodies and will hold us in our extension-based and pain-provoking patterns. Moving one leg out to the side adds insult to injury. This rotates our already stressed pelvis and lower back and stretches out the front of the hip that is moved out toward the side.

Want to know your pattern? Know more positioning trips throughout the day? Start a rehabilitation process to help heal your body for good? Contact Integrate 360 Physical Therapy at 314-733-5000 or email Lesley@integrate360pt.com or Nancy@integrate360pt.com today!